Wednesday, December 16, 2015

DOOR LOCK PROBLEM ON POLO 9N

DOOR LOCK PROBLEM ON POLO 9N


For the past week or so, I've noticed some peculiarity  with my VW Polo's left side  front passenger door locking mechanism. To risk stating the obvious, my VW Polo is a right hand drive car. Its auto lock feature is enabled, so when I drive and reach about 15 kmph all the doors lock simultaneously and the sound made by the four solenoids are clearly audible when this happens. But then, the front passenger door immediately unlocks itself. Initially it was the sound of the solenoid in the left passenger door that alerted me to the fact that it locks then unlocks itself.  

Physically, all four door buttons/knobs  are retracted at 15 kmph, three stays down but the left front passenger door buttons/knobs pops back up again. After this happened a few times,  I re-locked it  by pressing the internal central locking button on the driver's door panel. The left passenger door responded to the central locking lock instruction by re-locking but then immediately unlocks itself again. It just doesn't seem to want to stay down.

Thinking that it was just an electronic glitch and that the door might still be locked, even if the button jumps up. So I stopped the car, rolled down the left passenger window, climbed over the console, stuck my hand outside and pulled on the door catch. Surprise, surprise the door opened.  So I thought to myself, this isn't good, in fact it really sucks.  It's a huge safety risk driving with an unlocked door, especially considering the amount of bag snatching and car hijacking that's been taking place of late. 

Thieves and criminals hanging out at stop signs and at a traffic lights patiently await the opportunity of an unlocked door coming their way, so that they can jump into your vehicle and rob you. I know of a case when three villains jumped into a nurse's car and forced her at knife point to drive to an ATM, to withdraw her daily cash limit. They then held her hostage until after 12:00 the evening just so that they could get the balance of her money from her account which was less than her daily limit for the next day. Fortunately they didn't harm her, but her nerves were totally shattered.   Anyway, what I discovered much late is that when the passenger door button/knob pops up and I can manually press it down, and it doesn't pop up thereafter and the door stays locked.

Anyway, this door button/knob popping-up  started to irk me and it was getting flippen irritating, so one afternoon when I got home from work, I decided to tackle the problem. I switched off the engine, removed the key from the ignition, and all the doors unlocked simultaneously, which is absolutely normal.  So I re-locked the car with the fob remote key and all the buttons stayed down as they should. When I depressed the fob remote key unlock-button twice in quick succession, and all the doors unlocked which is also perfectly normal. From this I deduced that the electronic circuit responsible for unlocking the passenger door must get its power via the ignition switch, since it only unlocks when driving at 15 kmph and not whiles it's stationary and therefore  there has to be a dedicated switch in each door. 

But before I start taking things apart I needed to make absolutely sure that the problem is in the left front passenger door.  I once again used the fob remote key to lock  all the doors to make sure that they stayed locked, which they did. When I unlocked the Polo with the fob remote key, only the driver's door unlocks which is perfectly normal. But within 3 seconds the left passenger door also unlocks, and that's not normal. So I realized the problem is specific to the left passenger door yet I needed to make absolutely sure.

Sitting in the drivers seat, I  turned on the ignition and opened the drivers door and saw the  red light, door-open icon in the dashboard instrument cluster turn on. I repeated this process on the front passenger and rear doors, as well as the boot lid, all of which activated  the red door-open icon except the left front passenger door. The next test was observing the interior light. As I opened the driver's door to get in, the interior light turned on, so I waited for the light to automatically turn off. I then reopened the door and the light turned on as it should. I repeated this action on the other doors which also worked as they should, except the front passenger door that didn't register that it was opened because the interior light stayed off.  

From this I deduced that both  the instrument cluster door-open icon and the interior light is powered from the same switch in the door which is actually  intermittent when not short circuit. Then I got out my laptop and my VCDS cable, rigged it up and Voila! With the all the doors wide open, as can be seen in the image below, the passenger door switch remained closed.
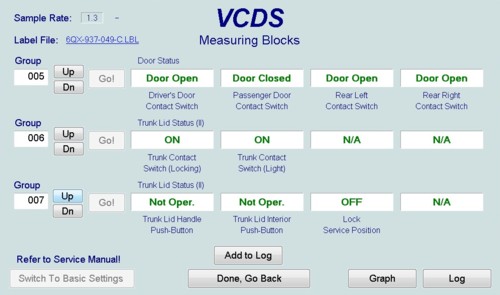


As can be seen in the above image, with all four doors open, the  software
still sees the passenger door is closed
As can be seen in these images the door and trunk Measuring Value Blocks are 005, 006 and 007. With all the doors closed, as can be seen in the images below,  the state of the passenger door switch didn't changes at all. So just for the hell of it, I banged the passenger door a few times hoping that the switch would budge because I'm certain it was stuck in place rather than the contacts burnt together. 


Now that the preliminaries are out of the way,  I can finally get out the screw drivers, spanners and the torx wrench and dismantle that pesky door mechanism. The following pics gives a fairly good idea of what it entails to remove the door lock; and on a scale of 1 to 10 with 10 being the most difficult I give it a 7. Removing and replacing the steel trace link that fits between the exterior handle and the lock is quite a challenge if you  have large hands. 
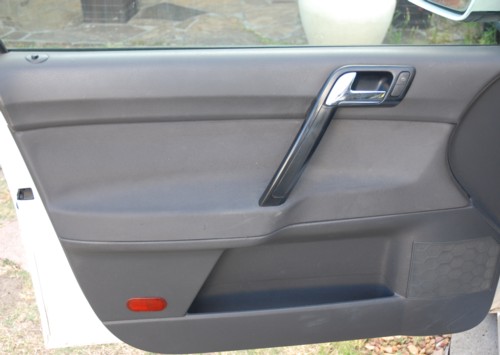

The door panel before dismantling it
The plastic cover removed to expose the screws.
Removing door handle screw with hex key
The inside view of the door panel with the electric window plug unplugged
The slide mechanism mounting plate with all its screws removed
Removing the torx screws that secure the door lock
The sliding window removed from its clamps and stored safely
Screws of the backing pate, the inside door handle, 
the door lock and the inside door lever
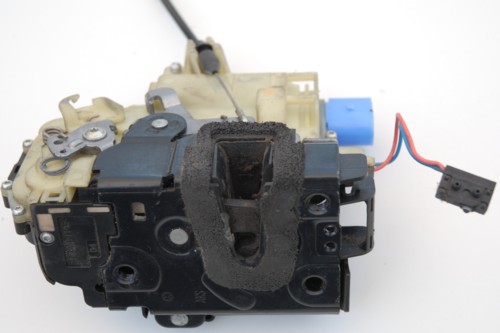
The passenger door lock with the micro switch dangling on its blue and red wires

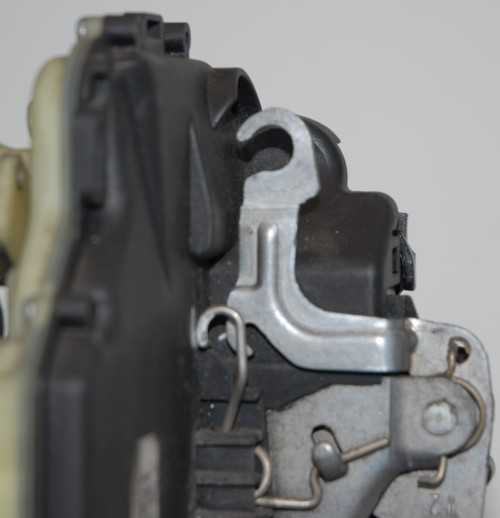
I sprayed the the micro switch with some Q20 multipurpose lubricant  and flicked it a number of times. I also cleaned the the metal pawl that activates the micro switch. It has a little notch in it, that fills up with grime. I suspect it is this grime and plastic burrs that cause the micro switch to misbehave.  I used two straight pins to pierce the insulation of the micro switch wires in order to connect my Fluke multi-meter so that I could do a continuity tests.

Continuity measurement of the micro switch in its normally open position 
Continuity measurement with the micro switch depressed -closed position.
The steel trace link between  the outside door handle and the lock.  It is 
quite difficult to remove and put back especially if you have large hands.
The door lock "question mark looking" lever, is where the 
short steel trace cable links into
The steel trace must be held in the horizontal  position before it can 
be inserted  into place.
Showing the steel trace link in place, but it has to inserted during 
assembly when the lock in secured to  the door frame.
Several other VW Polo owners have had similar problems with one or more of their doors. For example: When you lock the car with the inside central locking button, the left hand side passenger door does not open when it is unlocked, so the driver has to roll down the window an open it from the outside. I clearly remember that both my Golf 1 and Golf 2 had door lock issues and a replacement lock was really cheap. In fact it was less that the price as a pack of 30 cigarettes. But times have changes and considering the replacement cost of a VW Polo door mechanism (R900 -R1200 excluding labour) and what a shitty job it is to replace it, most drivers just learn  to live with it.  The nature of VW central locking issue can range  from mechanical to electronic, from a sticky micro switch, to cracked/dry solder joints on the printed circuit board. Sometimes  grime / builds -up between the micro switch and its activator, so give it a good clean and spraying the micro switch would be wise once the relevant lock has been removed. 

I know of a VW Pasat that had a similar issues. When the car is unlocked with the fob key neither of the inside nor the outside handles would open the door and since the door needs to be open to repair/ remove  the lock, the car eventually had to go to the agents who charge a whopping R5500.00 to fix it. At least if the other doors had a keyhole to open them, it would have been so much easier. But it is all about cost saving for manufacturers.

Other issues

Central Locking, central locking problem, doors unlock, doors will automatically lock, remote key entry to unlock all the doors, remote unlocking, dealing with locking unlocking issues, can open the door from outside nor inside, remote not working on left passenger door, front passenger door immediately unlocks itself, door unlocks automatically, Doors lock with fob key  then unlock themselves, it locks and then unlocks,

Friday, December 11, 2015

BRAKE PAD REPLACEMENT

BRAKE PAD REPLACEMENT


Wear and tear on any car is expected and is a natural part of everyday motoring. In most cases when a car goes to the VW service agents for a service, they will often advise on the condition of the brakes pads but very seldom if ever replace them. So it is very likely that your car's brakes pads may reach end of life somewhere between services. This means that you either have to take it back to the service agents for them to replace your vehicles brake pads and that at an exorbitant cost or you do it yourself. Considering that break pads are very straight forward to replace and can be done within and hour. Here I'm referring to the front brake pads. It is also very unlikely that all four brake pads will require replacement at the same time. On a level of 1 to 10 where 10 is the most difficult, Brake pad replacement weighs in at around 3. If you can change a tyre you should be able to replace your own car's brake pads because it has less than half the amount of bolts of one wheel. 

On my VW Polo 2.0L Highline each brake caliper is secured with only 2 bolts and I'm almost sure that goes for most other VW, Audi, Skoda and Seat vehicles too. The tools required is a 18 mm socket and a power bar, a jack, 2 jack stands and a wheel brace. Ok, perhaps a large hefty screwdriver with which to prize open the brake piston completely. 


The brake pad wear light is clearly visible right in the center of  the instrument cluster.

When my dash light came on I knew I only had 2 mm of brake lining left because the last time I fooled around with my VCDS software and my "Dual-K plus CAN interface cable", I specifically selected 2 mm before the warning is sounded. Anyway when the brake pad replacement light went on, I made my way to the VW service agents to get a set of brake pads because I was going to replace them myself.  As can be seen in the image below the brakes are genuine Volkswagen Brake pads made in India for VW, SEAT, and SKODA. 

Genuine Volkswagen  Brake Pads for 2.0L vehicles

The incorrect brake pads for a VW Polo 2.0L Highline

They weren't too expensive and considering what they do, they are actually worth every cent. The spares agent supplied the "correct brake pads" for a VW Polo 2.0L Highline and when I opened the box back home, I was convince they were the ones I needed because the brake pad box listed several other 2.0L VW vehicles amonst which are New Beetle / Cabrio 1998 - ...., Bora / Variant / 4 Motion 1997 - ..., Caddy 2004 - ..., Golf / Variant / 4 Motion 1997 - ..., Golf Plus 2005 - ..., Jetta 2005 - ..., Polo 2001 - ..., Polo Limousine (Stufenheck) 1996 - ..., Seat Altea 2004 - ..., Seat Ibiza 2002 - ..., Seat Leon 2000 - ..., Seat Toledo 1999 - ..., Skoda Fabia 2000 - ..., Skoda Roomster 2005 - ..., Skoda Octavia 1999 - ...  

I was always under the impression that the Skoda Octavia was the same as a VW Polo GTI hence I figured the brakes were the correct ones but I was mistaken. As luck would have it, when I stripped out the worn front brake pads  they were completely different from the  the new brake pads that I just bought. 


Worn brake pads with slightly less than 2 mm of bonding left.
So off I went back to the agents to get the correct brake pads. Unfortunately they didn't have any  so I had to get an OEM set elsewhere.  After much shopping around, I eventually found the correct ones made by Vika. They were an exact match to my sample brake pad.


The correct brake pads after the exchange
The correct Brake Pads for the VW Polo 2.0L highline
The correct brake pads with the sensor connector in the foreground
The three pads without brake pad thickness sensors.
Now that the I had the correct pads, I cleaned out the excess dust, squirted a bit of molyslip synthetic grease into the spring clips where the two little wings of the brake pad slides in, and fitted the new brake pads in like 45 minutes.  I connected the brake pad sensor plug and I made doubly sure that I torqued the bolts securing the calipers. I pumped the brake pedal a few times to make certain that the pistons advanced against the  brake pads and I even topped-up the brake fluid. After replacing the wheels, I was back on the road in a jiffy. It took me way longer to go buy and exchange the correct pads than it took to actually fit them.


The worn brake pad before it was removed
The caliper removed with excess dust removed.
The brake pad piston fully retracted with the anti rotating plate in place.
Resting the Caliper on top of the disc is quite convenient to fit the brake pads
The 2 new brake pads positioned in their grooved spring clips with sensor wire visible
New brake pads after it was fitted 
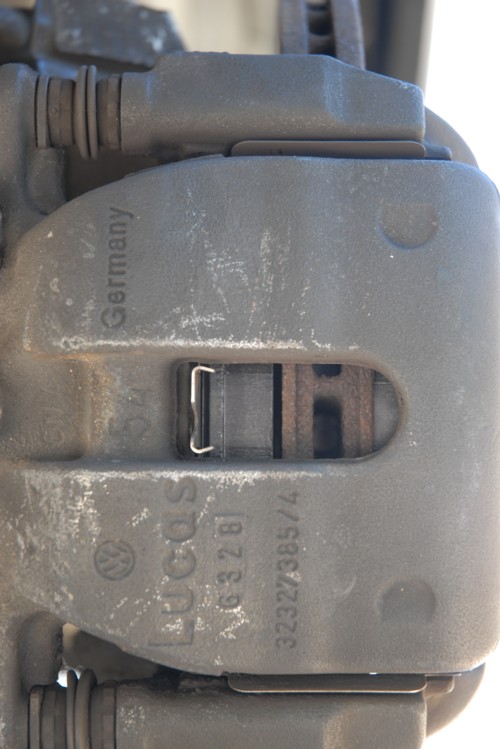
The new brake pad is clearly visible through the vent in the caliper

Monday, December 7, 2015

LEAKING METAL COOLANT PIPE

LEAKING METAL COOLANT PIPE

My 2007 VW Polo 2.0L Highline has just turned eight and it seems like she is going to start giving me  problems. Just yesterday, on my way back from Paarl, after driving a total round trip distance of approximately 300 Km, I was jolted to attention by the pong-pong sound of the dashboard alarm/buzzer. Looking at my VW Polo's instrument panel, saw the red thermometer symbol flashing on the cluster display  and the heat gauge was hovering around 100 degrees. The needle was lying just beneath the first red line in the gauge and I felt my heart throbbing in my throat. I immediately thought  the worst, that my cylinder head gasket may have popped, but lucky for me I was just a few hundred meters away from home and not on a deserted on an open road somewhere in the outback. Never in all the time I owned my VW Polo 2.0L Highline has anything like this ever happened. She currently has 105 ??? Km on her clock and is due to go for a major service soon, especially for the cam belt replacement. Considering I'm only averaging about 13 000 Km per annum, she has been put to very little use.

Anyway, because the instrument panel display symbol was flashing red, I kinda thought it was the oil light. I muttered to myself, that it can't be that the oil is low, because I checked it before the trip and even topped it up. Then I realized that the oil symbol is an oil-can, but that water is symbolized by a thermometer.  However  I drove my VW Polo 2.0L Highline into my driveway, switched off the engine and when I popped the bonnet I could hear hissing caused by the steam that was escaping. Yet, I couldn't see where it was steaming  from, though I saw a steady stream of green coolant running past my shoes.  I instinctively pulled out the dipstick and saw that  the oil level was normal and even more importantly that the oil was translucent and didn't look like dirty yoghurt, like when water gets into the oil. I then removed the PVC engine cover and saw a thin stream of green coolant squirting from the rubber hose that connects to the expansion tank at the point where it connects to a metal coolant pipe and held together with a spring loaded clamp. The thin stream of coolant didn't justify the amount of water streaming on the ground. I  thought it was a welsh plug that got pushed out by the water pressure, but it wasn't. After taking a closer look,  I saw coolant leaking from the junction where  the metal coolant pipe fits into a round hole in the engine block which is situated at the back end of the alternator, like right next to the metal housing that contains the thermostat,  with the rest of the pipe hiding behind the distributor pack and situated below the knock sensors.

Suddenly this all looked very familiar to me. I've had a similar problem with my 1999 Renault Megan Scenic a few years back. The leaking metal coolant pipe in question had two rubber O-rings in tandem around it, on the section that gets inserted into the round hole in the engine block. The rubber O-rings are the only two thing that prevents water from escaping. At the time I thought is was quite lame of Renault to design such a flimsy setup, instead of pressing a pipe stem into the engine block, to which a rubber hose could be clamped. Anyway, be that as it may, Volkswagen used the very same exact old concept used by Renault on their 1999 vehicle on a 2007 VW Polo, but with only one rubber O-ring.  I think it really sucks when some design feature that is commonly known to be troublesome is perpetuated in later models as impetus to a cash cow business model. VW must be selling millions of these metal coolant pipes per annum which is horrendously expensive considering that its just a cheap piece of mild steel  pipe. No rocket scientist was needed to design it, bend it, or spray it black. In fact a copper pipe equal in length costs less than one third of its price.

Be that as it may. The metal coolant pipe that protrudes from the engine block is in fact the only metal pipe in the entire cooling system and is made of such a thin metal that it will corrode to nothingness within a few years or less.  Besides the single rubber O-ring perishes from the engine heat and the cause of water and coolant leaks.  It is the weakest point of  failure in VW, Audi, Skoda and Seat vehicles, however  the trick is to keep the coolant to water ration at 50/50 or 1:1 since the coolant stems corrosion. But if for whatever reason the coolant ratio has a lot more water than coolant, then that metal coolant pipe just isn't going to last.  After going through the trouble of removing this pipe, I was tempted to make-up this pipe from copper pipe and copper fittings but since it is going to make contact with the engine block, corrosion of different metals in the presence of water is far worse than the corrosion between two metals of the same kind. 

The problem I had with my metal coolant pipe installation was that after I removed it, I discovered that it wasn't the correct part. The part number is 06A 121 065 E but there are like dozens of variations amongst which are the 06A121065 AR, or the 06A121065 BK, or the 06A121065AP, or 06A 121 065 N, or the 06A121065D that is used in the Audi A3 1.6, the Skoda Octavia 1.6, the VW Golf Mk IV 1.6, the VW Jetta IV 1.6, Seat Toledo  Mk II 1.6,   Seat Leon 1.6, Seat Ibiza Mk III 1.6, and  the 06A121065 Q and 06A121065 BD used in Audi TT's and other Audis.  Metal coolant pipe 03G121065H / 03L121065AJ / 03L 121 065 AJ are use in VW, Audi, Seat's and Skoda's, 06K121065L and 5Q0122291H used in VW Golf VII, 04L 121 065AJ  - 04L121065AJ is used in Audi A3, VW Golf 2.0 & + 1.6 L Diesel, 06B121065L is used in VW Passat, 06H121065 D are used in the Audi Q5 2.0 TFSI, Audi A4, B8, A5 and 8T.  06C121085F is used in the Audi A6 and A4 V6 3.0L Convertible. And the list goes no...

By looking at the picture of the two metal coolant pipes below, the difference between them are clearly visible even though they look alike. I could theoretically use this pipe, but the mounting bracket was in a different position, which meant I couldn't secure it properly, and I wasn't going to take a chance to fit it. The fact that the end of the pipe was a little longer and curved upwards were minor and totally surmountable. But it's best to get the identical replacement, so quote your cars VIN when buying it. Replacing this pipe is roughly a three hour job and its difficulty level is about a four and totally doable by the average hands-on DIY VW, Audi, Seat or Skoda owner.  Tools needed, are a grip pliers or water pump pliers to slacken off the water hose clamps, a 6 mm hex key to remove the distribution pack and bracket, a 7 mm hex key to remove the bolt marked as 10 on the cooling system diagram, a 14 mm socket and ratchet to remove the knock sensor bolts and a 4 mm torx to loosen the air filter. That's it.

It is only a matter of time before every VW, Audi, Seat and Skoda's cooling systems that sports this metal coolant pipe develops a leak. In my case the pipe was perforated beneath the rubber hoses with small holes that a nib of a pen could go through. In fact by just scratching the rust from inside the pipe with screw driver only made the holes bigger. It is inevitable that this metal coolant pipe is going to disintegrate through  rust because it is made of a far less durable metal than the engine block metal, besides the rubber hoses are bound to outlast this metal coolant pipe.  It would be worth your while to buy one of these metal coolant pipes and keep it in storage, because it is inevitable that this pipe is going turn to rust. When I went to the agents they had no stock and they could get one of two that were in stock at the factory within two days. This tells me this pipe is so popular that the agents get  sold out very quickly. In fact they only guaranteed this metal coolant pipe  for  24 months or  39 000 km or 24,000 miles. Yeah,  know that sucks... hard.


A word of warning though. Keep a magnet close-by when replacing this pipe because I dropped the allen key head bolt marked 10 on the cooling diagram somewhere below. I spent almost half and hour looking for this bolt but finally found it underneath the  clutch cable bracket on top of the gearbox. The screw rolled into a little crevice beneath the bracket and it cannot be seen from above.  This green coloured 7 mm  hex key headed bolt slipped from my hand while trying to screw it into position which is somewhat awkward  to get into position because of the clutch cable bracket obstruction. I searched beneath the car on the ground, between the front suspension mechanisms, stuck my fingers between the drive shaft and the engine, and all along the control arms and finally found it by using a magnet. Another thing that sucks, is that the long screw of the distributor pack bracket is made of some kind of  soft metal. I damaged its allen key head when I loosened it by hand, fortunately a 10 mm spanner also fits. The other two shorter screws are of a much harder metal. The images below gives you a fair idea of what it entails to replace this ye metal coolant pipe.  Remember when reassembling to re torque the Knock sensors and take care that the connector for knock sensor for cylinder 3 & 4 is turned away from the distributor pack bracket before tightening.

Water/coolant  leaks from the O-ring seal where it enters the engine block.
The coolant pipe runs along two sides of the engine block, 
right below the knock sensors.
The distributor pack unplugged. Be careful not to
break its clip when disconnecting
The distributor pack and plug wires clearly marked
with the first four letters of the alphabet
The distributor pack moved out of the way, sort of flipped-up.
As can be seen the long screw is different from the shorter black screws,
take care not to break of off on the engine block
The distruibutor pack bracket that straddles the coolant pipe. 
The Knock sensor for cylinders 3 & 4 removed after the distributor
pack was removed and positioned out of the way.
At the  90 degree bend of the coolant pipe with the knock sensor above it.
The coolant pipe is clearly visible and so is the rust that
poured out from the engine block.
The air filter must be removed to get the the mounting screw and the
rubber hoses at the end of the metal coolant pipe.
Removing the clamps that holds the rubber hose onto the metal coolant pipe.
The metal coolant pipe with the two rubber hoses disconnected.
This is the space where the metal coolant pipe resides. The two screw holes
for the knock sensors are clearly visible.
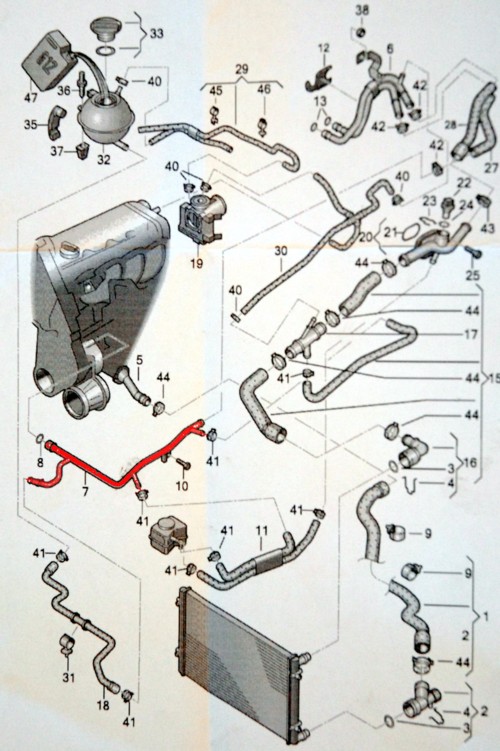
The cooling system of the VW Polo Classic. The metal pipe is coloured red.

The part number  06A121065 E is stamped on the wing that
aligns the distributor bracket.
The pipes are similar but the new one is slightly longer and curved upwards
at its end, yet have the same part number. The O-ring is   3mm x 20 mm
As can be seen, the mounting brackets on the two pipes doesn't correspond

Saturday, November 21, 2015

KNOCK SENSORS

KNOCK SENSORS

Gone are the days when you could fix your own car with simply logic. Today you require digital logic, a scan tool  and a tech savvy mechanic to make sense of the latest cars because they are all very precisely controlled by electronic circuits. The Engine Control Module is just one such circuit and largely depends on several of its sub-circuits and associated automotive control modules to achieve the precision needed to propel the latest engines using high octane fuel, and burn it stoichiometrically in order to deliver the performance expected from these modern cars. But this is easier said than done because these sub-circuits and associated control modules rely on a number of inputs sensors and actuators distributed all over the engine and the car in general, to successfully control of the crank synchronous path.


In order for the ignition sub-system to function optimally for example, it requires feedback information about what is presently happening in the engine so that it can take corrective action if needs be, in real time. Likewise the fuel mixture sub-circuit can only determine if the mixture is rich or lean from the feedback information, then take corrective action to increase or decrease the quantity of fuel based on the amount of oxygen present. Like wise the crankshaft timing sub-circuit depends on feedback information and maintain a constant torque. Yet all three these ECM sub-circuits works very closely in conjunction with one another and other sub-circuits to achieve optimal performance. 

Restated, the ECM is in control of the torque and torque reduction circuits, which just happens to annoy the arse-mousse out of Volkswagen, Audi, SEAT and Skoda owners. It is commonly referred to as the EPC -Electronic Power Control. Essentially EPC is limp mode's best friend and vehicle owners worst enemy.  ECM torque reduction is handled via the crank synchronous path, and involve the  ignition system sensors, the knock sensors, and fuel mixture both short trim and long trim. 

Input signals are needed for calculating precise ignition timing:


1) Engine Coolant Temperature Sensor (ECT)  

2) Engine Speed Sensor (RPM)  

3) Throttle Control Valve Sensor  

4) Camshaft Position Sensors

5) Knock Sensors  

6) Accelerator pedal Position sensors


By monitoring the Engine Coolant Temperature Sensor (ECT), the ECM varies the parameters of the engine as it heats up and maintains it when it has reached the correct operating temperature. 

By monitoring Engine Speed Sensor (RPM) the ECM can determine how many times the coils misfires per 1000 revolutions and how many times the injectors fail to deliver fuel. 

By monitoring the Throttle Control Valve Sensor the ECM can calculate the torque compared to how wide the throttle opens. 

By monitoring the Camshaft Position Sensors the ECM can better determine the exact time when the valves close and the exact point of ignition. 

By monitoring the  Knock sensors the ECM decides whether detonation is bad enough to take action, either  to retard / advance the engine or reduced the torque and consequently prevent engine damage. 

By monitoring the Accelerator Pedal Position sensors it can determine synchronicity between the position of the accelerator pedal when depressed and the throttle control valve and and discrepancy outside of its normal parameters will reduce the torque. 


KNOCK SENSORS


Knock sensors are very important to the overall engine torque because they detect combustion knocks in the individual cylinders. This is common when high octane fuel self ignites  which is generally known as knocking (detonation) or pinging (pre-ignition).
Knock sensors are piezo-electric components acts something like microphones do, but instead of picking up sound,  they detect vibrations in an engine which are needed by the ECM to correct the combustion process in the event of detonation or pinging.  This allows the ECM  to "retard" the engine so that it would work with different quality fuel. This implies that lower octane fuels are more prone to knock than higher octane fuels. It is therefore imperative to use the correct octane fuel prescribed for your vehicle since failure to do so can cause the EPC light to turn on and cause the vehicle to enter into limp mode.

TESTING KNOCK SENSORS


Four and six cylinder engines have 2 knock sensors each. Knock sensor 1 monitors the even bank of cylinders while Knock sensor 2 monitors  the odd bank of cylinders. W8 and W12 engine have 4 knock sensors each.  Knock sensor 1 monitors  cylinders  1 & 2, Knock sensor 2 monitors  cylinders 3 & 4, Knock sensor 3 monitors cylinder 5 & 6, and  Knock Sensor 4 monitors cylinder  7 & 8. Knock sensors are mounted directly on the crankcase and must be torqued. Failure to torque a knock sensor may cause it to malfunction and pickup engine vibrations as well as detonations.

The plug for Knock sensor (KS) 1 is normally green and it monitors cylinders  1 & 2, whereas the plug for Knock sensor (KS) 2 is normally grey and it monitors cylinders 3 & 4. Knock sensors are three pin devices with  Pin 1 = Signal, Pin 2 = Ground and Pin 3 = Shielding. Using a multimeter measure the resistance for "short circuit" between pins 1 and 2, then 1 and 3, then 2 and 3 at the Knock sensor connector. This measurements should always read infinity (open circuit).  If short circuit, replace knock sensor and make sure that it is correctly torqued to the crankcase.  Also check the wires for short circuit. If short circuit, replace. If a oscilloscope is available, connect it between pins 1 & 2 of the knock sensor. Tap the knock sensor lightly with a wrench, this should produce a fairly high frequency irregular sinusoidal waveform with a higher amplitude towards its middle. If there is no waveform coming out of the knock sensor its best to replace it because it will lead to a rise in fuel consumption and the engine management system may reverts to emergency knock control and reduce overall engine performance.


Thursday, November 19, 2015

A CALL FOR EMISSIONS TESTING OF ALL MAKES OF MOTOR VEHICLES

A CALL FOR EMISSIONS TESTING OF ALL MAKES OF MOTOR VEHICLES  


By now, virtually everyone who owns a VW, Audi, Skoda or a Seat or those who don't, must  have heard about the Volkswagen AG emissions scandal. A scandal of global proportions  that rocked the entire automotive  industry and affects 11 million diesel powered vehicles as well as some 430 000 petrol powered vehicles, all of which were fitted with the now notorious "cheat device". Initially the Volkswagen management pleaded ignorance about said "cheat device" but later stepped up to the plate, admitting their liability and offering restitution to all VAG vehicle owners directly affected  by the "cheat device"


This excludes you and me and all our fellow VW group vehicle owners who have also been compromised by Volkswagen's exploits, whether it was intentional or not. I'm specifically referring to all VAG vehicle owners loosing value on the vehicles since the scandal  broke, which is still dropping steadily.  According to Volkswagen we would just have to bite the bullet, but is offering to make a once off financial cash/voucher disbursement to all VAG vehicle owners directly affected by the "cheat device". Meanwhile, Governments from several countries are up in arms about their carbon credits, and instituting litigation against Volkswagen for the shortfall on taxation paid by consumers, because of the "doctored emission values.  Scandal mongers have been heckling and spreading rumours that the emissions problem, more than likely affect all of the 127 models of cars produced by Volkswagen. 

However, in my opinion, Volkswagen cannot be the only auto manufacturer that got their emissions figures to wrong, especially considering its global market share and its clout within the automotive industry. It gives the impression that someone out there is not too happy with Volkswagen for whatever reason and decided to set the wheels of blame, revenge, envy in motion. Having said that, there are rumours and allegations that other motor manufacturers used similar software  devices to cheat at emissions. However, none of them have come forward or owned up like Volkswagen did. Is it possible that the Kyoto protocol emission reduction agreements that were discussed over several years then ratified are unattainable, too presumptuous or just impossible to meet? If there is even the slightest truth in that, then all automotive manufactures would fall short of the target. Or is it that out of a class of x, Volkswagen is the only kid that failed. 


Evidently his cannot be true especially considering that German engineering impress and in many cases even exceeds their own expectations.  Based on this assumption, I call for emissions testing across the entire spectrum of motor vehicles, especially American cars because they were renown as gas guzzlers and where there is fire, is obviously a lot of smoke. With COP21 just a month away, it would be in the interest of all vehicle owners to demand that their preferred manufacture submit their cars for emission testing. It would be a great injustice to Volkswagen and VAG vehicle owners if all the manufacturers are guilty and only Volkswagen gets burnt in the process. Add you opinion below if you think that all motor manufacturers emissions figures needs to be scrutenized.


All these Vehicles were emission tested


vw polo highline, swift zdi vs vw polo highline, volkswagen polo 1.2 l highline, volkswagen polo 1.2 l highline d, volkswagen polo 1.2 mpi highline, volkswagen polo 1.2 tsi highline, volkswagen polo highline 1 4, volkswagen polo 1.4 5p. highline, volkswagen polo 1.4 highline 75cv, volkswagen polo 1.4 highline 80cv, volkswagen polo 1.4 tdi highline 75cv, volkswagen polo 1.4 tdi highline 80cv, volkswagen polo 1.6 l highline, volkswagen polo 1.9 tdi highline 96kw for sale, volkswagen polo 6n2 highline, volkswagen polo classic 1.6 highline, volkswagen polo highline accessories, volkswagen polo highline audio system, volkswagen polo highline ausstattung, volkswagen polo highline black, volkswagen polo highline blue, volkswagen polo highline bluetooth, volkswagen polo highline colours, volkswagen polo highline deep black, volkswagen polo highline diesel mileage, volkswagen polo highline diesel on road price, volkswagen polo highline diesel on road price bangalore, volkswagen polo highline diesel on road price in chennai, volkswagen polo highline diesel on road price in hyderabad, volkswagen polo highline diesel price in india, volkswagen polo highline diesel review, volkswagen polo highline diesel second hand, volkswagen polo highline diesel used, volkswagen polo highline diesel used cars, volkswagen polo highline images, volkswagen polo highline india, volkswagen polo highline india review, volkswagen polo highline interior photos,  volkswagen polo highline interiors, volkswagen polo highline km 0, volkswagen polo highline mexico, volkswagen polo highline mileage, volkswagen polo highline model, volkswagen polo highline occasion, volkswagen polo highline on road price, volkswagen polo highline petrol features, volkswagen polo highline petrol mileage, volkswagen polo highline petrol on road price bangalore, volkswagen polo highline petrol user reviews, volkswagen polo highline price bangalore, volkswagen polo highline price in chennai, volkswagen polo highline price in mumbai, volkswagen polo highline r line, volkswagen polo highline red, volkswagen polo highline review, volkswagen polo highline review team bhp, volkswagen polo highline specifications, volkswagen polo highline specs, volkswagen polo highline sr, volkswagen polo highline tdi, volkswagen polo highline tyre size, volkswagen polo highline vs gt, volkswagen polo highline vs hyundai i20 asta, volkswagen polo highline vs swift zxi, volkswagen polo highline white, volkswagen polo india highline price, volkswagen polo reviews highline petrol, vw polo 1 2 tsi 105 highline 5d, vw polo 1 6 tdi 105 highline 5d, vw polo 1 6 tdi 90 highline bm 5d, vw polo 1 6 tdi highline, vw polo 1.2 cr highline bsiv, vw polo 1.2 cr highline bsiv price, vw polo 1.2 highline 64ps, vw polo 1.2 highline review, vw polo 1.2 tsi dsg highline, vw polo 1.2 tsi dsg highline optimum, vw polo 1.2 tsi highline eu, vw polo 1.2 tsi highline forum, vw polo 1.2 tsi highline jahreswagen, vw polo 1.2 tsi highline kopen, vw polo 1.2 tsi highline pepper grey, vw polo 1.2 tsi highline r-line, vw polo 1.4 fsi highline, vw polo 1.4 highline, vw polo 1.4 highline gebraucht, vw polo 1.4 highline nasıl, vw polo 1.6 tdi highline gebraucht, vw polo 1.6 tdi highline km 0, vw polo 1.9 tdi highline, vw polo 1.9 tdi highline 74kw, vw polo 1.9 tdi highline 96kw, vw polo 1.9 tdi highline 96kw for sale, vw polo 1.9 tdi highline for sale, vw polo 2.0 highline for sale, vw polo 2.0 highline fuel consumption, vw polo 2.0 highline review, vw polo 2.0 highline specs, vw polo 5 highline, vw polo 50 servo highline, vw polo 60 servo highline, vw polo 6c highline, vw polo 6n highline, vw polo 6n2 highline ausstattung, vw polo 6r highline, vw polo 6r highline ausstattung, vw polo 6r highline test, vw polo 81 kw highline, vw polo 9n highline, vw polo 9n highline ausstattung, vw polo 9n3 highline, vw polo classic 2.0 highline, vw polo classic 2.0 highline for sale, vw polo gp 1.2 tsi highline, vw polo highline, vw polo highline 1 2 tsi, vw polo highline 1 4 tdi, vw polo highline 1.2 tsi, vw polo highline 1.2 tsi 2014, vw polo highline 1.2 tsi 2015, vw polo highline 1.2 tsi dsg, vw polo highline 1.2 tsi test, vw polo highline 1.4, vw polo highline 1.4 16v, vw polo highline 1.4 2010, vw polo highline 1.6, vw polo highline 1.6 tdi, vw polo highline 1.6 tdi dpf, vw polo highline 1.6 tdi dpf 90ps 7-dsg, vw polo highline 2006, vw polo highline 2009, vw polo highline 2010, vw polo highline 2011, vw polo highline 2013, vw polo highline 2013 india, vw polo highline 2014, vw polo highline 2015, vw polo highline 2016, vw polo highline 2017, vw polo highline 90 ps, vw polo highline ablagefach, vw polo highline adac test, vw polo highline ausstattung, vw polo highline automatik, vw polo highline autoscout24, vw polo highline baujahr 2000, vw polo highline black, vw polo highline diesel, vw polo highline diesel 2013, vw polo highline diesel 2014, vw polo highline diesel ebay, vw polo highline diesel gebraucht, vw polo highline diesel india, vw polo highline diesel price, vw polo highline diesel review, vw polo highline diesel review team bhp, vw polo highline dsg, vw polo highline eu neuwagen, vw polo highline executive, vw polo highline facelift, vw polo highline features, vw polo highline for sale, vw polo highline gebraucht, vw polo highline gebraucht kaufen, vw polo highline gebrauchtwagen, vw polo highline india, vw polo highline interior, vw polo highline jahreswagen, vw polo highline kaufen, vw polo highline km 0, vw polo highline konfigurator, vw polo highline konfigurieren, vw polo highline kopen, vw polo highline leasing, vw polo highline lenkrad, vw polo highline limousine, vw polo highline mexico, vw polo highline music system, vw polo highline navi, vw polo highline neu, vw polo highline neues modell, vw polo highline neupreis, vw polo highline neuwagen, vw polo highline nieuw, vw polo highline pepper grey, vw polo highline petrol, vw polo highline petrol 2011, vw polo highline petrol 2013, vw polo highline petrol price, vw polo highline petrol review, vw polo highline petrol team bhp, vw polo highline petrol user review, vw polo highline plus, vw polo highline price, vw polo highline price in chennai, vw polo highline price in kolkata, vw polo highline r line, vw polo highline review, vw polo highline second hand, vw polo highline shadow blue, vw polo highline specials, vw polo highline specification, vw polo highline specs, vw polo highline tageszulassung, vw polo highline tdi, vw polo highline te koop, vw polo highline team bhp, vw polo highline test, vw polo highline tsi, vw polo highline tsi test, vw polo highline tyre size, vw polo highline tyres, vw polo highline udstyr, vw polo highline usado, vw polo highline usata, vw polo highline velgen, vw polo highline video, vw polo highline vs comfortline, vw polo highline vs sr, vw polo highline vs swift zdi, vw polo highline vs swift zxi, vw polo highline weiß, vw polo highline wiki, vw polo highline xenon, vw polo highline youtube, vw polo trendline comfortline of highline, vw polo tsi highline for sale, vw polo tsi highline manual, vw polo tsi highline review, vw polo unterschied comfortline highline, vw polo unterschied trendline comfortline highline, vw polo v highline, vw polo variant highline, vw polo wersja highline.

Monday, November 16, 2015

TRAPPED INSIDE VW POLO

TRAPPED INSIDE VW POLO

Believe it or not, I got locked inside my VW Polo and couldn't get out. The self lock was activated, and me pulling at the door release lever just had no effect. The locking indicator pin surfaced from hiding put retracted when I released the door lever. For the sake of clarity, let me start at the beginning.  In a previous blog, I mentioned that when my VW Polo 2.0 Highline sedan was returned from its 90 000 Km service, it came back with a stripped nut  that tightens the earth terminal of the battery. I suspected that it was the cause of intermittent loss of power steering and I was going to get round to replacing it, but I just didn't have the time. Yep, procrastination is an evil that does get the better of all of us at one time or the other. 
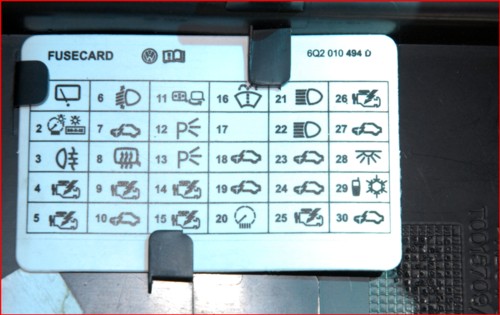
VW Polo 9N Fuse card

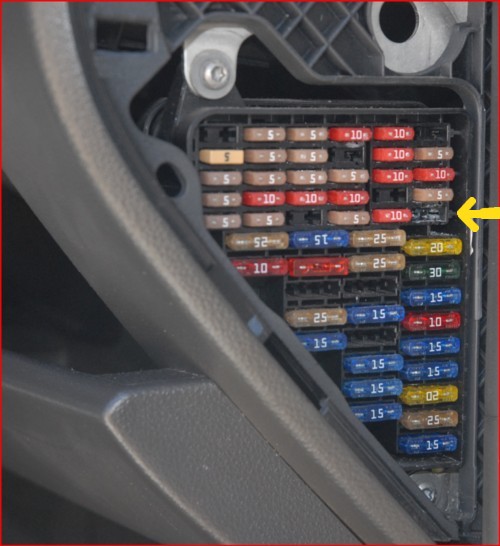
Anyway, getting locked inside my VW Polo on Saturday morning gave me a scare that I immediately went and replaced the entire terminal and not just the stripped nut. The previous evening, whilst driving home from movies, the dashboard lights on my VW Polo stopped working, it kinda just went dark. So when I arrived home, I started fiddling to determine why, and I discovered that the wipers and the indicators weren't working either. Must be a fuse I thought. So I went straight to the fuse box and whipped out  the scorecard. Seconds later I identified the fuse responsible for supplying the dashboard with power (marked with yellow arrow and see the powdery substance in fuse holder, it's most probably oxidation from condensation). I got out my multimeter and checked the 5A fuse (fuse 30) and as I suspected, it was open circuit, fused, blown. Oh crap, I didn't have a spare so the following morning, off I went to the auto spare to get a replacement.  It was rather hot so I opened my window about 10 cm before I took off. As I pulled away,  the  self  lock  engaged at the very moment I realized that I didn't  take my wallet. So I stopped, reversed back about the 100 meters I drove, switched off the engine pulled out the key, pulled the door handle and it wouldn’t  open. Pulling at the door release lever just raised the locking indicator pin put retracted when I released the door lever. I then reinserted the key, turned on the ignition, pressed the unlock button on the door, heard the door unlock, opened the door, jumped out, ran inside grabbed my wallet, got back into the Polo and off I went once again.  

VW Polo 9N Fuse holder

This time, I noticed that the auto lock engaged at about 40km ph. Thinking nothing of it, I arrived at the auto spares, switched off the engine, pulled out the key, pulled the door release lever and like before it wouldn't open.  And as before I reinserted the key turned on the ignition, pressed the door release yet nothing happened. I then realized that the ignition wasn’t on. So I attempted to start the engine and nothing happened. The battery terminal wasn't making contact, I came loose once again and the engine wouldn't start. By extension, there was also no power to the door electronics that operated the door. In desperation to get out, I even tried the fob remote unlock button even though I knew that without a battery connection the door electronics cannot open and neither power the motor that rolls down the electric windows. I was stuck inside. I figured if I could get my arm through the 10 cm opening, I could possibly open the door manually with the key. But the opening was too small or my arm too thick.  Now it was starting to get hot inside the Polo. My only other option was to ask a passer-by to unlock the door for me. So a few minutes later an elderly gentleman walked by, whom I alerted, and speaking through the window opening, and handing him the key   through the window opening, I asked him to unlock the door which he obligingly did.  

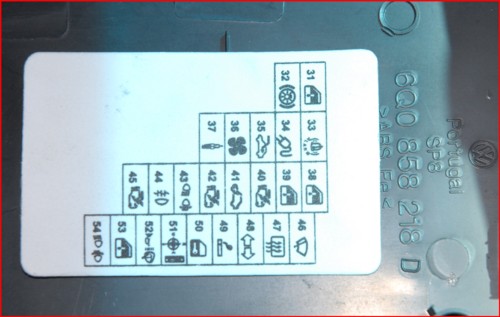
VW Polo 9N Fuse card

With the door open, my mind was racing, what if the window wasn't slightly open, meaning I wouldn't have been able to pass the key to anyone to open the door. I would have been trapped inside and helpless. The escalating heat would have got the better of me. I probably would have had to kick-in the driver-door window since it's the only door that actually has a key receptacle, so that I could unlock it from the outside. This made me wonder what would happen if the battery gets damaged or destroyed in a collision and I was injured inside and not able to break the window. I know that in the event of a crash when the airbags pop, the on-board software is configured to automatically unlock the doors, but what if the supply voltage to the indicators gets shorted in a crash causing that fuse in question  also to blow. Clearly this is a hazard, and I would think a small sealed backup battery like those used for alarm systems fitted inside the cockpit under the dash or the consol would be a good idea. I think the brave among you should try to replicate this problem on your vehicles by removing the 5A fuse in question and disconnect the battery then assess whether or not this is acceptable design or a reason to get into Volkswagen's face about it. They are already going through the pressures of their emissions scandal, and it really isn't nice to kick a dog when it's down.