Monday, January 4, 2016

TRANSMISSION LIMP MODE

TRANSMISSION LIMP MODE 


During the late 1970's to the early 1980s, the on-board computer made its first appearance, responsible for monitoring and controlling the vehicle's engine. It started out with better fuel economy in mind,  followed by a  electronic capacitive discharge ignition systems (CDI), then electronic points and engine timing were introduced. Soon thereafter it encompassed anti-lock braking (ABS), airbags (SRS), climate control (HVAC), electronic stability control (ESP) and emissions control among several others. Today, virtually every subsystem in your vehicle is controlled by a computer  interfaced with sensors of sorts – including the automatic transmission’s shift timing sequence and line pressure.   The manifold absolute pressure (MAP) sensor and throttle position sensor (TPS), among several other, supplies the engine’s load signals and information which is used by the  Engine Control Unit (ECU) to inform the Transmission Control Unit (TCU) when to manage gear up-shift and down-shift, especially when you’re driving up an incline or inclined toward spirited driving. Since there is so much electronics, there is so much more that can go wrong,  so a  "fail safe" system had to be employed as a safety feature just in case of signal errors  that occur  outside of its expected range.  A feature that would protect the engine / transmission from "runaway" that could cause it to self destruct. 

There is even an Electronic Pressure Control (EPC) valve safety circuit, integrated directly in the transmission hydraulic circuit of all VAG vehicles. When necessary, a part of the gearbox is depressurised to prevent any transmission clutches from closing uncontrolled due to  excessive clutch pressure. This is feature is called the "Emergency Program" aka "Limp Mode"  or "Limp Mode Home".

When your Audi, Volkswagen, Seat or Skoda's  EPC light,  and or the Check engine light,  and or DPF (Diesel Particulate filter) light turns on, your car is likely to go into limp mode, if  it hasn't  already entered into Limp mode. Other than the illuminated light or lights in the instrument panel, and an engine that will not rev more than 2000 revs, neither exceed 30 kph, it gives you absolutely no explanation why it happened.  To make matters worse, there is no definitive list of what causes this elusive limp mode but I have tabulated some of them from personal experience. 


How to fix limp home mode


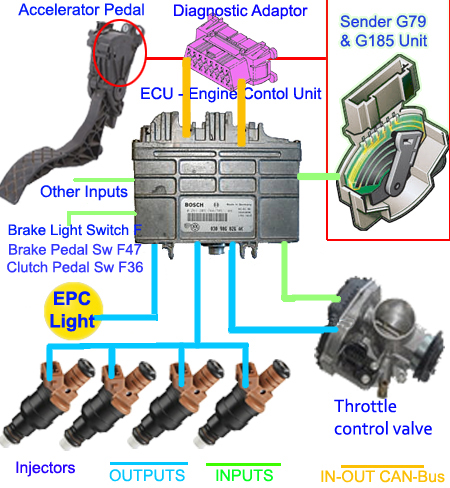
  • Throttle Pedal Sensors (TPS), G79/G185
  • Throttle body Position sensors, G187/G188 
  • Throttle Valve Control Module, J338
  • Engine Component Power Supply Relay, J757
  • Intermittent Ignition Coils, N, N128, N158, N163
  • Fuel Injectors N30, N31, N32, N33
  • Transmission Control Module J217
  • Waste-gate Actuator Valve, N75
  • Knock Sensor, G61 
  • Fuel pressure sensor G247 
  • Fuel pressure regulator valve, N276 
  • Automatic transmission electronic pressure control (EPC )   solenoid / stuck solenoids
  • Transmission solenoid harness
Volkswagen Automatic Transmission Solenoid and Harness kit.
The only way to repair an EPC fault (Limp Mode) or for that matter any fault on any VAG vehicle, is to do a DLC scan to pull the Diagnostic Trouble Codes (DTC) to at least point you in the right direction. One of the most miserable Limp mode experiences ever is a Transmission Limp Mode. They range from a transmission that is low on fluid, to stuck in 2nd gear, to jumping out of gear, to noisy gears selection. But the worst is when  engine antifreeze water from the radiator enters through the corroded ATF cooler lines into the transmission, also allowing the ATF to leak  into the engine coolant, radiator and engine. 


Knowing the Germans, their just had to be a oil cooler for the automatic gearbox integrated somewhere into the radiator. Even though VW claim that ATF is a lifetime fluid", it is only a matter of time before it mixes with antifreeze and water. Anyway, this happens to  the all-in-one radiators  of Volkswagen Jettas, VW Golf 4, Passat B6, Audi A4 Quattro  and I suspect other VAG vehicle which I havn't personally experienced. It also happens to the Mercedes Benz C250, but it's  not an exclusive German car design flaw. It s also prevalent in the Nissan Pathfinder, Fords and Pontiac as well as several Asian vehicles.

Once the oil cooler lines spring a leak inside the plastic radiator, it messes-up the entire system by mixing the anti freeze water mixture with ATF. Yet with all the vehicle on-board electronics there is no visible sign that this cross flow happened nor any electronic detection or indication. Since oil is less dense than water, the gears in the transmission runs in water which causes the  metal gears to rust besides taking  the facings off the clutch plates. Beside the water shorts out the printed circuit board driving the solenoids on the valve body. This type of extensive damage can result in a very expensive transmission replacement if it isn't detected before the damage is done. 


Volkswagen  valve body
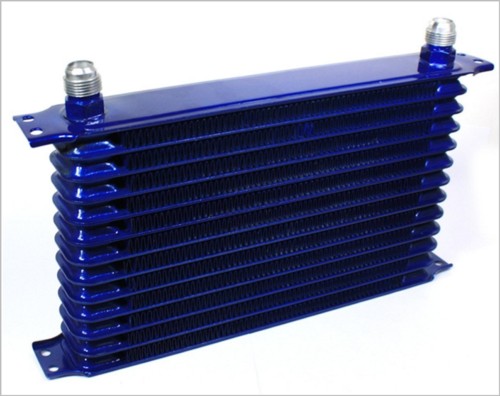
An easy way to identify this problem, is to check the ATF dipstick level often, which needs to be between the two notches marking min and max. Much more than that can indicate ATF floating on water. Also verify that the colour of the ATF is translucent red and not brown or black. Bi-annual ATF replacement, though expensive should almost guarantee a trouble free transmission. The logic behind an all-in-one radiator ATF cooler is to heat-up the ATF with the hot radiator water during cold conditions because oil tends to become thick and gel when very cold.  But is may be in your interest to replace your all-in-one ATF cooler with a separate / free standing oil cooler as used in the new cars if you live in a country where it never snows or never experience freezing cold weather.

Universal Aluminum  after market Automotive 13-Roll Transmission Oil Cooler

Friday, January 1, 2016

NEW GENERATION ALL ELECTRIC PHAETON LUXURY SEDAN

New Generation All Electric Phaeton Luxury Sedan

Volkswagen has been delaying the inevitable for way too long by fooling around with emission cheating devices in its EA 189 TDI - 2.0L and 3.0L Diesel Engines, and completely missed the window of opportunity enjoyed by its competitors. To the point that the EPA has placed a halt on all VW diesel engines destined for use in 2016 vehicles.  Meanwhile Toyota sales have topped VW sales for the month of November and outsold Volkswagen for 5th straight month. At this rate Toyota is likely to outsell VW for  December and very likely for the entire year of 2015. 


I'm certain this vexes Volkswagen greatly because Volkswagen has been blowing its own horn as the 'Group of the year for 2014' even though  they are no longer considered among the top fifty companies in Germany. In an attempt to regain its status and as a measure to contain the fallout of the Diesel emissions debacle, the newspapers and magazines have been inundated with Volkswagen Service offers flaunting slogans like.

"Volkswagen Service is proud to introduce Volkswagen Economy Packages".

"Nobody knows Volkswagen better than we do and  nobody's better equipped to service it."

"Let the people who built your car, service and repair your car". 


"You  get service of the highest international standard - 100% Volkswagen service".

"Your Volkswagen is Serviced by Volkswagen Certified  Technicians, highly trained and relentlessly dedicated".

The million dollar question is, "Is this enough to make a come back" or "Is it a matter of too little too late". The Diesel Gate Scandal  that cost Volkswagen tens of billions of dollars only caused an enormous surge in EV interest. Today EV prices compare very favourably with petrol and diesel equivalents and electric cars are no longer the preserve of the rich minority. They are now available to anybody who wants a reliable, cheap-to-run car because the days of spending $75 per week to fill up your polluting car will soon be over. 

Considering electric cars have no emissions, and their speed, performance and range have vastly improved. EV's carry no road tax levy and its running costs are as little as 4 cents per mile, a quarter of the average cost for petrol / diesel cars. The Toyota Prius is currently sold in more than 90 countries and its global cumulative sales have passed the  5.2 million units mark  in July 2015. This figure represents 65.4% of the 8 million hybrids sold worldwide by Toyota Motor Company since 1997. Toyota's sales figures for the first three quarters of 2015 stands at 21,210,000,000.00 JPY = 162,256,500.00 EUR or 176,255,100.00 USD.


Volkswagen is on the back foot for not embracing EV's sooner and is scrambling to get their New Generation All Electric Phaeton Luxury Sedan to market by 2017, which is destined to rival both Tesla and Mercedes Benz. The next big question is, "Can VW pull this off sucessfully"?

Initially when Volkswagen's launched their first-generation Phaeton luxury sedan, their objective  was  to prove that they are the world's innovation and engineering leader, and not Mercedes-Benz or Rolls Royce. But the $70,000+ Phaeton was a flop in  North America and was discontinued, yet  it  underpinned the hugely successful Bentley Continental and the Audi A8. From this one can easily see that the Phaeton was probably something very special hence it survived the chopping block,  as all  non essential / unnecessary projects were scrapped because of the ongoing diesel emissions scandal.

A rendered model of what the New Generation all electric Phaeton luxury sedan could look like.
Tesla Signature Series Model X with Tesla's Autopilot autonomous driving system.

VOLKSWAGEN GOES ELECTRIC

VOLKSWAGEN WAS DELAYING THE INEVITABLE

EV's (electric vehicles) has been around as long ago as the mid 1930's, but back then, they were called trolleybuses or  trams. As can be seen in the two images below, these EV's served as mainstream transport for the masses and believe it or not, are still in use in many places in Europe today. The technology though very old, is of long standing and proven, which is essentially a high voltage  electric motor that can deliver high horsepower at high RPM, connected via a gearbox to the drive train. Talking about trains, trains are in fact also EV's but with a slight difference. These EV's of days gone by, both trams and trains are attached to some sort of umbilical from which it received its electrical power to propel whereas modern EV's rely on portable battery power which until now hasn't been very efficient. 

But according to Elton Musk, CEO of  Tesla motor company, this isn't strictly true because they have an entire range of Tesla cars that can do as much as 265 miles (426 km) between battery recharges. He is also of the opinion that the maximum limit of what’s possible with diesel and gasoline has been reached and that the time has come to embrace a new generation of technology.

Trams in Alexandria Eqypt.


Trams in Vienna by Martin Otner


Frankly speaking,  I don't think its about the battery's inefficiencies but rather about the lack of facilities to charge your EV's battery when enroute or at your destination. But in the same breath I need to add that the charging problem is easily surmountable because a solar panel driven charging system (green technology) can easily be sold as an accessory with every EV and can be installed in your home garage. An overnight charge would give the average vehicle user sufficient power to commute virtually all day.

Admittedly, getting high efficiency from a high-voltage motor powered by a lithium-ion battery pack is not easy because there are many factors that effect efficiency, non of which I believe would have been too difficult for Volkswagen to solve. It just kinda seems that Volkswagen was delaying the inevitable even tough they've been flaunting their all-electric, minicar, e-up concept for the past number of years. Yet whilst still grappling  with the global fallout that originated from its diesel emissions scandal, VW recently reaffirmed the brand’s commitment to electrification. Sharing that they are working on a "standardized electric architecture" for all VW vehicles  with motors and flat battery design components that can fit in the various VW vehicle body shapes and vehicle types. 

Adding that VW is  also creating a new business segment called “New Volkswagen” to bundle modern development of digital features for Internet connected vehicles and other related mobility services. This announcement was  based on the  fact the  Silicon Valley firms like Apple Inc. and Alphabet Inc. are planning to make inroads into the automotive segment with software development and battery production. 

Vw even released a photo of its brand new all-electric concept car with an expected  driving range of 155–186 miles, scheduled to debut at the Consumer Electronics Show in Las Vegas in Jan of 2016. But the main surprise was the news that the next generation Phaeton super-luxury sedan will be an EV—only and not available in nether diesel or gasoline. Its going to have  a pure electric drive with long-distance capability, connectivity, and next-generation assistance systems as well as an emotional design.

Saturday, December 26, 2015

EPC Q & A REVISTITED

EPC Q & A REVISTITED

Of late, Vag vehicle owners are experiencing Electronic Power Control problems more frequently than ever before yet most VW, Audi, Skoda and Seat still have no idea what an EPC fault is and what causes the EPC light to turn on. To add insult to injury some VW, Audi, Skoda and Seat service agents tend to "repair" these faults by trial and error, costing the vehicle owners exorbitant amounts of money only to later discover that the fault persists. The EPC warning light can be found in selected models in virtually all makes of cars and is not limited to just Volkswagen Audi, Skoda and Seat vehicles. Volkswagen Audi, Skoda and Seat use Electronic Power Control in their drive by wire vehicles as a safety feature which in my opinion isn't all that safe. Case in point, I have had my VW Polo go into limp mode whilst overtaking a car in a two way street.  It stalled at the very moment when I was cutting-in in front of the said car, causing its driver to frantically brake and swerve to avoid colliding with the rear of my car because  suddenly I wasn't accelerating any longer. Not to mention the on-coming car, which swerved toward the shoulder of the road since my car was straddling the white line. My EPC problem turned out to be the incorrect octane fuel.


Be that as it may, by the time the EPC light illuminates in the dashboard, in response to some sensor detecting a problem, the problem already occurred in either the torque control, traction control, throttle body and sensors, accelerator pedal sensors, cruise control,  fuel supply or ignition systems. Essentially the epc light is just a way to tell you that there is a problem with the drive by wire system and generally remain on until the fault is cleared.  At the instant that the EPC light illuminates, the  ECU flags a DTC which is then stored in the relevant electronic control module. This DTC gives a fair idea of the suspect system but cannot pinpoint  the culprit component. 


QUESTION?

Anonymous says:- Hey I have a 06 Passat 2.0t and I am reading all of these stories on the EPC my check engine light was already on while I was driving but the car was good. I was on my way to work after stopping at the gas station and my EPC light came on and my car stalled on the highway and has not came back on. The lights windows and everything works but when I try to turn the car on it attempts to turn but never does. 


ANSWER!

From your description I understand that after your EPC light came on, your car won't restart. So you checked the light and windows which tells me you suspected that the battery may have run down and perhaps not strong enough to turn the engine over.  But you also mentioning 'check engine light'. A combination of check engine light and EPC light is emissions related and if your car's emissions exceed a predetermined level, the ECU will prevent the engine from starting. Its best that you have your car scanned to see what DTC it threw out. 


QUESTION?

Musa Brain says:- Hi there. I have a VW polo vivo I have the EPC light on when I'm driving slowly and also when I'm reaching a stop sign and hit the clutch pedal it turns off and when I start it in the morning it turns off so I have to rev it for it to idle but after some few minutes the EPC light comes on. Please help?


ANSWER!

Musa your description of your EPC problem seems that you car doesn't idle fast enough. I assume that its drives normal whiles on a higher rev. It quite evident that it switches off when you come to a halt and whilst it's cold. I suspect that you have a blocked air filter problem that doesn't allow sufficient air to the MAF, but I could be wrong since you provide no DTC's. It could also be a blocked fuel filter that starves stichiometricity since torque is determined by both  air and fuel. 


QUESTION?

Bogdan Iova says:- When I swich key on the EPC light not apear and teh engine not start. Golf 1.6 16V 


ANSWER!

Bogdan, you really haven't given me much to work with here, but off hand it seems that you may have a blown fuse that powers the instrument cluster. Because the moment you turn on the ignition key, the OBD II system does a self  diagnosis by turning on all the dash board lights for about 10 seconds whilst running the test.  It then turns off  those light related to the circuits that function normally and leaves those lights on, for circuits that fail the test.  So, if you EPC light does come on when you turn on the ignition , then goes off,  you don't have an EPC problem.   However if your engine won't start it's obviously cause by something else. It could be that your battery has reached end of life. If the engine doesn't turn over, even the starter could have packed-up. But if it does crank and won't start, check your fuel gauge to at least determine that you have fuel in the tank.  Related to this could be your ECM Power Relay, your fuel pump relay or the fuel pump itself. Without more info, this is about all I can help you with. DTC codes would have been helpful.


QUESTION?

Anonymous says:- Hi there, I have a 2003 polo 1.6, EPC light is on and when it's idling can't rev it, checked and cleaned the throttle body and still same issue, ran a diagnostics check and it says something about the pedal, please help?  


ANSWER!

Hi Anonymous, you seem to have a classic EPC problem but for the benefit of everyone else, it would have been great to share the DTC codes that you recovered. I suspect it must have been one of the following codes since you mention the error code said something about the accelerator pedal.

18038  P1630 Accel, Pedal Position -G79 signal too small  (low)
18039  P1631 Accel, Pedal Position -G79 signal too largely (high)
18040  P1632 Accel, Pedal Position -G79 supply voltage  malfunction

18041  P1633 Accel, Pedal Position -G185 signal too small
18042  P1634 Accel, Pedal Position -G185 signal too largely
18047  P1639 Accel, Pedal Position -G79 & -G185 out of range 

You also mentioned that you checked and cleaned the throttle body. If you dismantled it in anyway, then you need to redo adaptation, else the ECU would have no idea how wide the butterfly valve has opened.  Remember there is no throttle cable connecting the accelerator pedal to the throttle housing. This is known as a drive by wire system and it communicates the driver's torque demand to the ECU. The two potentiometers in the accelerator pedal assembly communicates the pedal position directly to the engine control module (ECM) using two separate signals, one signaling the pedal physical position and the other indicating rate of pedal movement.  You will need a scan tool to do the adaptation because any faults in memory must be cleared before adaptation can be done. 


The most common problem is the accelerator pedal itself. One or both of the potentiometers go high resistive/ intermittent and the accelerator pedal assembly should be replaced as a single unit. A tell tail sign of accelerator pedal trouble is that the engine revs higher than 800 rpm and at times the rev counter rises and falls continually whist idling, going as as high as 2000  rpm. If this happens, grab hold of the pedal whilst the car is idling and pull the pedal upwards, away from the floor. If the revs reduce and the surging stabilizers, replace the pedal. The image above shows idling whilst engine in surging and  the image below shows idling with the pedal pulled up.


Wednesday, December 16, 2015

DOOR LOCK PROBLEM ON POLO 9N

DOOR LOCK PROBLEM ON POLO 9N


For the past week or so, I've noticed some peculiarity  with my VW Polo's left side  front passenger door locking mechanism. To risk stating the obvious, my VW Polo is a right hand drive car. Its auto lock feature is enabled, so when I drive and reach about 15 kmph all the doors lock simultaneously and the sound made by the four solenoids are clearly audible when this happens. But then, the front passenger door immediately unlocks itself. Initially it was the sound of the solenoid in the left passenger door that alerted me to the fact that it locks then unlocks itself.  

Physically, all four door buttons/knobs  are retracted at 15 kmph, three stays down but the left front passenger door buttons/knobs pops back up again. After this happened a few times,  I re-locked it  by pressing the internal central locking button on the driver's door panel. The left passenger door responded to the central locking lock instruction by re-locking but then immediately unlocks itself again. It just doesn't seem to want to stay down.

Thinking that it was just an electronic glitch and that the door might still be locked, even if the button jumps up. So I stopped the car, rolled down the left passenger window, climbed over the console, stuck my hand outside and pulled on the door catch. Surprise, surprise the door opened.  So I thought to myself, this isn't good, in fact it really sucks.  It's a huge safety risk driving with an unlocked door, especially considering the amount of bag snatching and car hijacking that's been taking place of late. 

Thieves and criminals hanging out at stop signs and at a traffic lights patiently await the opportunity of an unlocked door coming their way, so that they can jump into your vehicle and rob you. I know of a case when three villains jumped into a nurse's car and forced her at knife point to drive to an ATM, to withdraw her daily cash limit. They then held her hostage until after 12:00 the evening just so that they could get the balance of her money from her account which was less than her daily limit for the next day. Fortunately they didn't harm her, but her nerves were totally shattered.   Anyway, what I discovered much late is that when the passenger door button/knob pops up and I can manually press it down, and it doesn't pop up thereafter and the door stays locked.

Anyway, this door button/knob popping-up  started to irk me and it was getting flippen irritating, so one afternoon when I got home from work, I decided to tackle the problem. I switched off the engine, removed the key from the ignition, and all the doors unlocked simultaneously, which is absolutely normal.  So I re-locked the car with the fob remote key and all the buttons stayed down as they should. When I depressed the fob remote key unlock-button twice in quick succession, and all the doors unlocked which is also perfectly normal. From this I deduced that the electronic circuit responsible for unlocking the passenger door must get its power via the ignition switch, since it only unlocks when driving at 15 kmph and not whiles it's stationary and therefore  there has to be a dedicated switch in each door. 

But before I start taking things apart I needed to make absolutely sure that the problem is in the left front passenger door.  I once again used the fob remote key to lock  all the doors to make sure that they stayed locked, which they did. When I unlocked the Polo with the fob remote key, only the driver's door unlocks which is perfectly normal. But within 3 seconds the left passenger door also unlocks, and that's not normal. So I realized the problem is specific to the left passenger door yet I needed to make absolutely sure.

Sitting in the drivers seat, I  turned on the ignition and opened the drivers door and saw the  red light, door-open icon in the dashboard instrument cluster turn on. I repeated this process on the front passenger and rear doors, as well as the boot lid, all of which activated  the red door-open icon except the left front passenger door. The next test was observing the interior light. As I opened the driver's door to get in, the interior light turned on, so I waited for the light to automatically turn off. I then reopened the door and the light turned on as it should. I repeated this action on the other doors which also worked as they should, except the front passenger door that didn't register that it was opened because the interior light stayed off.  

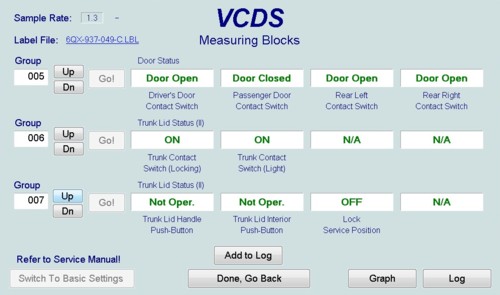
From this I deduced that both  the instrument cluster door-open icon and the interior light is powered from the same switch in the door which is actually  intermittent when not short circuit. Then I got out my laptop and my VCDS cable, rigged it up and Voila! With the all the doors wide open, as can be seen in the image below, the passenger door switch remained closed.


As can be seen in the above image, with all four doors open, the  software
still sees the passenger door is closed
As can be seen in these images the door and trunk Measuring Value Blocks are 005, 006 and 007. With all the doors closed, as can be seen in the images below,  the state of the passenger door switch didn't changes at all. So just for the hell of it, I banged the passenger door a few times hoping that the switch would budge because I'm certain it was stuck in place rather than the contacts burnt together. 


Now that the preliminaries are out of the way,  I can finally get out the screw drivers, spanners and the torx wrench and dismantle that pesky door mechanism. The following pics gives a fairly good idea of what it entails to remove the door lock; and on a scale of 1 to 10 with 10 being the most difficult I give it a 7. Removing and replacing the steel trace link that fits between the exterior handle and the lock is quite a challenge if you  have large hands. 


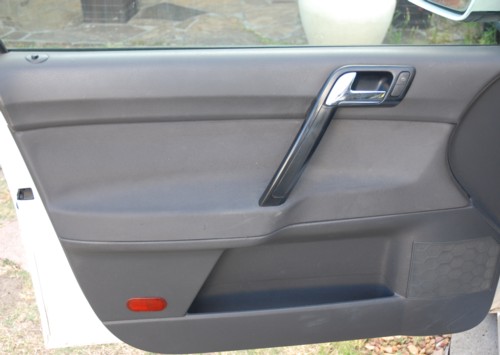
The door panel before dismantling it
The plastic cover removed to expose the screws.
Removing door handle screw with hex key
The inside view of the door panel with the electric window plug unplugged
The slide mechanism mounting plate with all its screws removed
Removing the torx screws that secure the door lock
The sliding window removed from its clamps and stored safely
Screws of the backing pate, the inside door handle, 
the door lock and the inside door lever
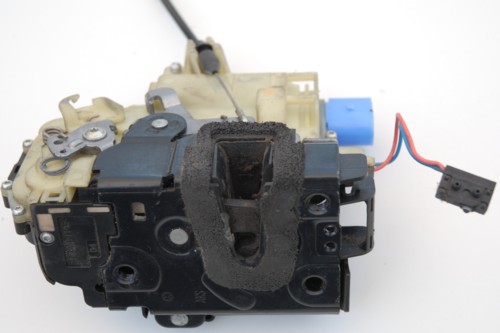
The passenger door lock with the micro switch dangling on its blue and red wires

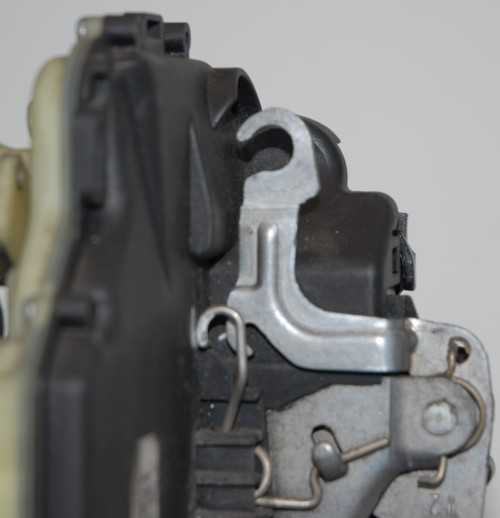
I sprayed the the micro switch with some Q20 multipurpose lubricant  and flicked it a number of times. I also cleaned the the metal pawl that activates the micro switch. It has a little notch in it, that fills up with grime. I suspect it is this grime and plastic burrs that cause the micro switch to misbehave.  I used two straight pins to pierce the insulation of the micro switch wires in order to connect my Fluke multi-meter so that I could do a continuity tests.

Continuity measurement of the micro switch in its normally open position 
Continuity measurement with the micro switch depressed -closed position.
The steel trace link between  the outside door handle and the lock.  It is 
quite difficult to remove and put back especially if you have large hands.
The door lock "question mark looking" lever, is where the 
short steel trace cable links into
The steel trace must be held in the horizontal  position before it can 
be inserted  into place.
Showing the steel trace link in place, but it has to inserted during 
assembly when the lock in secured to  the door frame.
Several other VW Polo owners have had similar problems with one or more of their doors. For example: When you lock the car with the inside central locking button, the left hand side passenger door does not open when it is unlocked, so the driver has to roll down the window an open it from the outside. I clearly remember that both my Golf 1 and Golf 2 had door lock issues and a replacement lock was really cheap. In fact it was less that the price as a pack of 30 cigarettes. But times have changes and considering the replacement cost of a VW Polo door mechanism (R900 -R1200 excluding labour) and what a shitty job it is to replace it, most drivers just learn  to live with it.  The nature of VW central locking issue can range  from mechanical to electronic, from a sticky micro switch, to cracked/dry solder joints on the printed circuit board. Sometimes  grime / builds -up between the micro switch and its activator, so give it a good clean and spraying the micro switch would be wise once the relevant lock has been removed. 

I know of a VW Pasat that had a similar issues. When the car is unlocked with the fob key neither of the inside nor the outside handles would open the door and since the door needs to be open to repair/ remove  the lock, the car eventually had to go to the agents who charge a whopping R5500.00 to fix it. At least if the other doors had a keyhole to open them, it would have been so much easier. But it is all about cost saving for manufacturers.

Other issues

Central Locking, central locking problem, doors unlock, doors will automatically lock, remote key entry to unlock all the doors, remote unlocking, dealing with locking unlocking issues, can open the door from outside nor inside, remote not working on left passenger door, front passenger door immediately unlocks itself, door unlocks automatically, Doors lock with fob key  then unlock themselves, it locks and then unlocks,

Friday, December 11, 2015

BRAKE PAD REPLACEMENT

BRAKE PAD REPLACEMENT


Wear and tear on any car is expected and is a natural part of everyday motoring. In most cases when a car goes to the VW service agents for a service, they will often advise on the condition of the brakes pads but very seldom if ever replace them. So it is very likely that your car's brakes pads may reach end of life somewhere between services. This means that you either have to take it back to the service agents for them to replace your vehicles brake pads and that at an exorbitant cost or you do it yourself. Considering that break pads are very straight forward to replace and can be done within and hour. Here I'm referring to the front brake pads. It is also very unlikely that all four brake pads will require replacement at the same time. On a level of 1 to 10 where 10 is the most difficult, Brake pad replacement weighs in at around 3. If you can change a tyre you should be able to replace your own car's brake pads because it has less than half the amount of bolts of one wheel. 

On my VW Polo 2.0L Highline each brake caliper is secured with only 2 bolts and I'm almost sure that goes for most other VW, Audi, Skoda and Seat vehicles too. The tools required is a 18 mm socket and a power bar, a jack, 2 jack stands and a wheel brace. Ok, perhaps a large hefty screwdriver with which to prize open the brake piston completely. 


The brake pad wear light is clearly visible right in the center of  the instrument cluster.

When my dash light came on I knew I only had 2 mm of brake lining left because the last time I fooled around with my VCDS software and my "Dual-K plus CAN interface cable", I specifically selected 2 mm before the warning is sounded. Anyway when the brake pad replacement light went on, I made my way to the VW service agents to get a set of brake pads because I was going to replace them myself.  As can be seen in the image below the brakes are genuine Volkswagen Brake pads made in India for VW, SEAT, and SKODA. 

Genuine Volkswagen  Brake Pads for 2.0L vehicles

The incorrect brake pads for a VW Polo 2.0L Highline

They weren't too expensive and considering what they do, they are actually worth every cent. The spares agent supplied the "correct brake pads" for a VW Polo 2.0L Highline and when I opened the box back home, I was convince they were the ones I needed because the brake pad box listed several other 2.0L VW vehicles amonst which are New Beetle / Cabrio 1998 - ...., Bora / Variant / 4 Motion 1997 - ..., Caddy 2004 - ..., Golf / Variant / 4 Motion 1997 - ..., Golf Plus 2005 - ..., Jetta 2005 - ..., Polo 2001 - ..., Polo Limousine (Stufenheck) 1996 - ..., Seat Altea 2004 - ..., Seat Ibiza 2002 - ..., Seat Leon 2000 - ..., Seat Toledo 1999 - ..., Skoda Fabia 2000 - ..., Skoda Roomster 2005 - ..., Skoda Octavia 1999 - ...  

I was always under the impression that the Skoda Octavia was the same as a VW Polo GTI hence I figured the brakes were the correct ones but I was mistaken. As luck would have it, when I stripped out the worn front brake pads  they were completely different from the  the new brake pads that I just bought. 


Worn brake pads with slightly less than 2 mm of bonding left.
So off I went back to the agents to get the correct brake pads. Unfortunately they didn't have any  so I had to get an OEM set elsewhere.  After much shopping around, I eventually found the correct ones made by Vika. They were an exact match to my sample brake pad.


The correct brake pads after the exchange
The correct Brake Pads for the VW Polo 2.0L highline
The correct brake pads with the sensor connector in the foreground
The three pads without brake pad thickness sensors.
Now that the I had the correct pads, I cleaned out the excess dust, squirted a bit of molyslip synthetic grease into the spring clips where the two little wings of the brake pad slides in, and fitted the new brake pads in like 45 minutes.  I connected the brake pad sensor plug and I made doubly sure that I torqued the bolts securing the calipers. I pumped the brake pedal a few times to make certain that the pistons advanced against the  brake pads and I even topped-up the brake fluid. After replacing the wheels, I was back on the road in a jiffy. It took me way longer to go buy and exchange the correct pads than it took to actually fit them.


The worn brake pad before it was removed
The caliper removed with excess dust removed.
The brake pad piston fully retracted with the anti rotating plate in place.
Resting the Caliper on top of the disc is quite convenient to fit the brake pads
The 2 new brake pads positioned in their grooved spring clips with sensor wire visible
New brake pads after it was fitted 
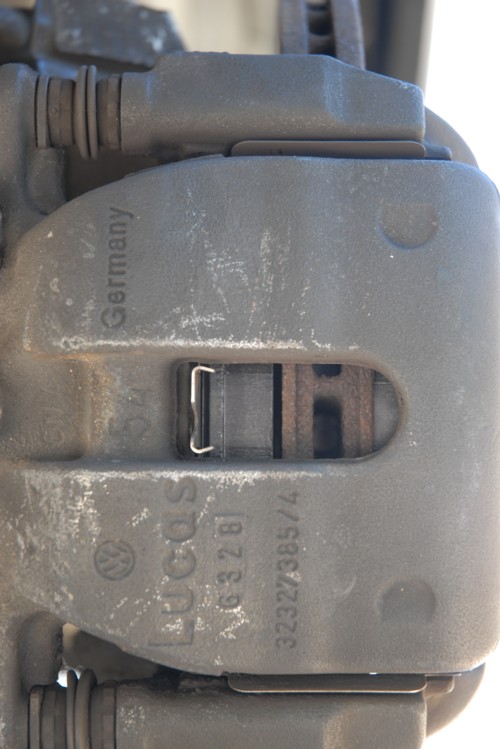
The new brake pad is clearly visible through the vent in the caliper

Monday, December 7, 2015

LEAKING METAL COOLANT PIPE

LEAKING METAL COOLANT PIPE

My 2007 VW Polo 2.0L Highline has just turned eight and it seems like she is going to start giving me  problems. Just yesterday, on my way back from Paarl, after driving a total round trip distance of approximately 300 Km, I was jolted to attention by the pong-pong sound of the dashboard alarm/buzzer. Looking at my VW Polo's instrument panel, saw the red thermometer symbol flashing on the cluster display  and the heat gauge was hovering around 100 degrees. The needle was lying just beneath the first red line in the gauge and I felt my heart throbbing in my throat. I immediately thought  the worst, that my cylinder head gasket may have popped, but lucky for me I was just a few hundred meters away from home and not on a deserted on an open road somewhere in the outback. Never in all the time I owned my VW Polo 2.0L Highline has anything like this ever happened. She currently has 105 ??? Km on her clock and is due to go for a major service soon, especially for the cam belt replacement. Considering I'm only averaging about 13 000 Km per annum, she has been put to very little use.

Anyway, because the instrument panel display symbol was flashing red, I kinda thought it was the oil light. I muttered to myself, that it can't be that the oil is low, because I checked it before the trip and even topped it up. Then I realized that the oil symbol is an oil-can, but that water is symbolized by a thermometer.  However  I drove my VW Polo 2.0L Highline into my driveway, switched off the engine and when I popped the bonnet I could hear hissing caused by the steam that was escaping. Yet, I couldn't see where it was steaming  from, though I saw a steady stream of green coolant running past my shoes.  I instinctively pulled out the dipstick and saw that  the oil level was normal and even more importantly that the oil was translucent and didn't look like dirty yoghurt, like when water gets into the oil. I then removed the PVC engine cover and saw a thin stream of green coolant squirting from the rubber hose that connects to the expansion tank at the point where it connects to a metal coolant pipe and held together with a spring loaded clamp. The thin stream of coolant didn't justify the amount of water streaming on the ground. I  thought it was a welsh plug that got pushed out by the water pressure, but it wasn't. After taking a closer look,  I saw coolant leaking from the junction where  the metal coolant pipe fits into a round hole in the engine block which is situated at the back end of the alternator, like right next to the metal housing that contains the thermostat,  with the rest of the pipe hiding behind the distributor pack and situated below the knock sensors.

Suddenly this all looked very familiar to me. I've had a similar problem with my 1999 Renault Megan Scenic a few years back. The leaking metal coolant pipe in question had two rubber O-rings in tandem around it, on the section that gets inserted into the round hole in the engine block. The rubber O-rings are the only two thing that prevents water from escaping. At the time I thought is was quite lame of Renault to design such a flimsy setup, instead of pressing a pipe stem into the engine block, to which a rubber hose could be clamped. Anyway, be that as it may, Volkswagen used the very same exact old concept used by Renault on their 1999 vehicle on a 2007 VW Polo, but with only one rubber O-ring.  I think it really sucks when some design feature that is commonly known to be troublesome is perpetuated in later models as impetus to a cash cow business model. VW must be selling millions of these metal coolant pipes per annum which is horrendously expensive considering that its just a cheap piece of mild steel  pipe. No rocket scientist was needed to design it, bend it, or spray it black. In fact a copper pipe equal in length costs less than one third of its price.

Be that as it may. The metal coolant pipe that protrudes from the engine block is in fact the only metal pipe in the entire cooling system and is made of such a thin metal that it will corrode to nothingness within a few years or less.  Besides the single rubber O-ring perishes from the engine heat and the cause of water and coolant leaks.  It is the weakest point of  failure in VW, Audi, Skoda and Seat vehicles, however  the trick is to keep the coolant to water ration at 50/50 or 1:1 since the coolant stems corrosion. But if for whatever reason the coolant ratio has a lot more water than coolant, then that metal coolant pipe just isn't going to last.  After going through the trouble of removing this pipe, I was tempted to make-up this pipe from copper pipe and copper fittings but since it is going to make contact with the engine block, corrosion of different metals in the presence of water is far worse than the corrosion between two metals of the same kind. 

The problem I had with my metal coolant pipe installation was that after I removed it, I discovered that it wasn't the correct part. The part number is 06A 121 065 E but there are like dozens of variations amongst which are the 06A121065 AR, or the 06A121065 BK, or the 06A121065AP, or 06A 121 065 N, or the 06A121065D that is used in the Audi A3 1.6, the Skoda Octavia 1.6, the VW Golf Mk IV 1.6, the VW Jetta IV 1.6, Seat Toledo  Mk II 1.6,   Seat Leon 1.6, Seat Ibiza Mk III 1.6, and  the 06A121065 Q and 06A121065 BD used in Audi TT's and other Audis.  Metal coolant pipe 03G121065H / 03L121065AJ / 03L 121 065 AJ are use in VW, Audi, Seat's and Skoda's, 06K121065L and 5Q0122291H used in VW Golf VII, 04L 121 065AJ  - 04L121065AJ is used in Audi A3, VW Golf 2.0 & + 1.6 L Diesel, 06B121065L is used in VW Passat, 06H121065 D are used in the Audi Q5 2.0 TFSI, Audi A4, B8, A5 and 8T.  06C121085F is used in the Audi A6 and A4 V6 3.0L Convertible. And the list goes no...

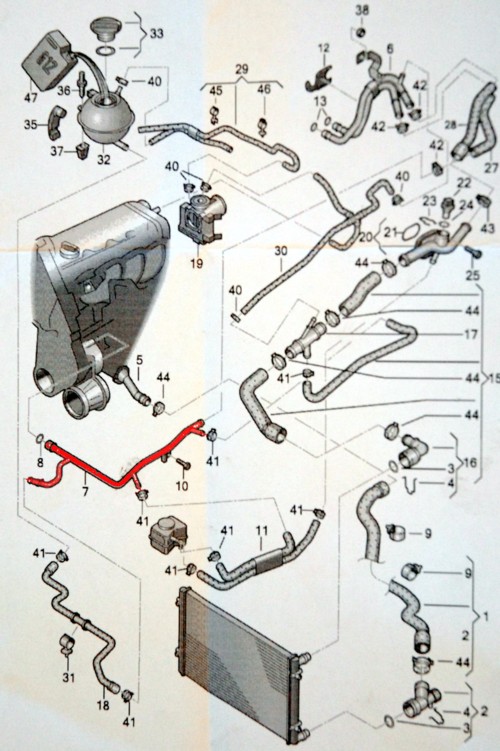
By looking at the picture of the two metal coolant pipes below, the difference between them are clearly visible even though they look alike. I could theoretically use this pipe, but the mounting bracket was in a different position, which meant I couldn't secure it properly, and I wasn't going to take a chance to fit it. The fact that the end of the pipe was a little longer and curved upwards were minor and totally surmountable. But it's best to get the identical replacement, so quote your cars VIN when buying it. Replacing this pipe is roughly a three hour job and its difficulty level is about a four and totally doable by the average hands-on DIY VW, Audi, Seat or Skoda owner.  Tools needed, are a grip pliers or water pump pliers to slacken off the water hose clamps, a 6 mm hex key to remove the distribution pack and bracket, a 7 mm hex key to remove the bolt marked as 10 on the cooling system diagram, a 14 mm socket and ratchet to remove the knock sensor bolts and a 4 mm torx to loosen the air filter. That's it.

It is only a matter of time before every VW, Audi, Seat and Skoda's cooling systems that sports this metal coolant pipe develops a leak. In my case the pipe was perforated beneath the rubber hoses with small holes that a nib of a pen could go through. In fact by just scratching the rust from inside the pipe with screw driver only made the holes bigger. It is inevitable that this metal coolant pipe is going to disintegrate through  rust because it is made of a far less durable metal than the engine block metal, besides the rubber hoses are bound to outlast this metal coolant pipe.  It would be worth your while to buy one of these metal coolant pipes and keep it in storage, because it is inevitable that this pipe is going turn to rust. When I went to the agents they had no stock and they could get one of two that were in stock at the factory within two days. This tells me this pipe is so popular that the agents get  sold out very quickly. In fact they only guaranteed this metal coolant pipe  for  24 months or  39 000 km or 24,000 miles. Yeah,  know that sucks... hard.


A word of warning though. Keep a magnet close-by when replacing this pipe because I dropped the allen key head bolt marked 10 on the cooling diagram somewhere below. I spent almost half and hour looking for this bolt but finally found it underneath the  clutch cable bracket on top of the gearbox. The screw rolled into a little crevice beneath the bracket and it cannot be seen from above.  This green coloured 7 mm  hex key headed bolt slipped from my hand while trying to screw it into position which is somewhat awkward  to get into position because of the clutch cable bracket obstruction. I searched beneath the car on the ground, between the front suspension mechanisms, stuck my fingers between the drive shaft and the engine, and all along the control arms and finally found it by using a magnet. Another thing that sucks, is that the long screw of the distributor pack bracket is made of some kind of  soft metal. I damaged its allen key head when I loosened it by hand, fortunately a 10 mm spanner also fits. The other two shorter screws are of a much harder metal. The images below gives you a fair idea of what it entails to replace this ye metal coolant pipe.  Remember when reassembling to re torque the Knock sensors and take care that the connector for knock sensor for cylinder 3 & 4 is turned away from the distributor pack bracket before tightening.

Water/coolant  leaks from the O-ring seal where it enters the engine block.
The coolant pipe runs along two sides of the engine block, 
right below the knock sensors.
The distributor pack unplugged. Be careful not to
break its clip when disconnecting
The distributor pack and plug wires clearly marked
with the first four letters of the alphabet
The distributor pack moved out of the way, sort of flipped-up.
As can be seen the long screw is different from the shorter black screws,
take care not to break of off on the engine block
The distruibutor pack bracket that straddles the coolant pipe. 
The Knock sensor for cylinders 3 & 4 removed after the distributor
pack was removed and positioned out of the way.
At the  90 degree bend of the coolant pipe with the knock sensor above it.
The coolant pipe is clearly visible and so is the rust that
poured out from the engine block.
The air filter must be removed to get the the mounting screw and the
rubber hoses at the end of the metal coolant pipe.
Removing the clamps that holds the rubber hose onto the metal coolant pipe.
The metal coolant pipe with the two rubber hoses disconnected.
This is the space where the metal coolant pipe resides. The two screw holes
for the knock sensors are clearly visible.
The cooling system of the VW Polo Classic. The metal pipe is coloured red.

The part number  06A121065 E is stamped on the wing that
aligns the distributor bracket.
The pipes are similar but the new one is slightly longer and curved upwards
at its end, yet have the same part number. The O-ring is   3mm x 20 mm
As can be seen, the mounting brackets on the two pipes doesn't correspond